Showing posts with label Autodesk Revit Model Review. Show all posts

Wednesday, April 13, 2016

Model Checking - What Tools Do You Use?

Working on updating my Modeling checking presentation for RTC EU. There are a lot of good model checking tools on the market including but not limited to:
I am interested in hearing about other tools that people might be using for model checking in addition to those listed above.

Thursday, January 7, 2016

Autodesk Revit Model Review - Workset Checking

If you have read any of my previous posts about Model Checking, then you are probably aware of how much I like Autodesk Revit Model Review. It’s free and it is fairly easy to use. When it comes to model checking, free and easy to use are important options.

At Davis Consulting, when we are tasked by a client to check models (cost is typically $400-1200 depending on complexity of model and standards to follow) we need to perform some kind of check on the worksets. There are numerous ways to do this, but we like to use automation as much as possible to reduce the time and the cost of the checking process. Unfortunately, workset checking  with Autodesk Revit Model Review has some issues and is one area where Autodesk Revit Model Review needs to be improved upon.

In the example I am going to show, we are going to check a model to make sure that all Interior Doors are in the Interiors workset. The shortcoming with Autodesk Revit Model Review is that we can’t just create a check that queries all the interior doors and makes sure they are on the worksheet called Interiors. The reason, Autodesk Revit Model Review doesn’t check for the worksheet name, it looks for a Revit internal value. We can query this value using the Pick Test tool found under HelpPick Test

2016 01 07 11 50 34
Figure 1 - Accessing Pick Test

When we pick on a element, in the class of Figure 2 a door, Autodesk Revit Model Review will open up the the Element Property List. This list exposes various parameter data. In this example, we want to look Worksheet data. The Text Value for the element we have selected is Interiors. However, if we want to search for the Interiors workset, we must search for the value 555, which is Revit’s internal value for the Interiors workset. Just note, that if you create a workset named Interiors in your project file, the internal value probably will not be 555. I don’t know how the internal value is created, but it appears to be random. This means if you want to run this check on multiple files, you would have to create different check files (.bcf) for each file, since the internal values for the worksets will be different.

2016 01 07 12 07 01
Figure 2 - Element Property List

For our workset check, we are going to create a new Parameter Requirements check, Check > Add > Standards > Parameter Requirements.

The second step is to create a Filter, to filter the objects that we want to examine. In this example, I want to look at Interior Doors. Now, there are several different ways we could approach this. Maybe your door family naming convention indicates interior usage, or an assembly code value could be specified that we could use to filter, etc. How I like to filter for this scenario is using the Function type parameter. This unfortunately, is another one of those situations where we can’t check the value that is exposed to the user in the Properties Palette, we have to check Revit’s internal value.

In Figure 3, I used the Pick Test tool and selected a door to validate the value of the Function type parameter. For an Interior value I need to use the internal value 0 in my check definition.

2016 01 07 15 49 19
Figure 3
So for my filter, I am going to filter so that I am only checking Category = Doors and the Parameter.Function = 0 and remember 0 = Interior.

2016 01 07 15 17 57
Figure 4

The third step is to define the Details of what we want to check, in this example, that Interior Doors are on the Interiors (555) workset. There are a couple ways that you can populate this dialog. you can do it manually by entering the values as shown below or you can use the Pick Element And Choose Parameter… option. This as the name suggests allows you to pick an element and then select the parameter that you want to use.

2016 01 07 15 17 17
Figure 5

You then need to save the file and then make sure to edit your profile (Profile > Edit) to add the check file so that you can run the check file. If you just want to download the .BCF file, it can be found here: http://davisconsultingservicesllc.com/Downloads.html. You will still need to edit your Autodesk Revit Model Review profile to include the check file in your profile so that you can execute it.
When you run the check, the results will appear similar to below.

2016 01 07 16 20 43
Figure 6

Wednesday, December 23, 2015

Autodesk Revit Model Review - Duplicate Element Check

In my last Model Checking post, I covered using the CADD Microsystems Revit Model Checker to search for duplicate elements. Autodesk has their own Model Checker which can be downloaded from the app store. It seemed to disappear for awhile (maybe I wasn't looking hard enough), but it's back for 2016 and I hope Autodesk puts the previous versions back up.

I really like the Autodesk tool. It's simple, yet provides a great deal of flexibility for checking models. Within a couple hours, you can create an entire checkset for a project. The Model Review also has a API that allows you to create custom checks.

The only disappointment that I have with the product is related to workset checking. There is not a way to check for specific worksets easily, due to the way Revit stores workset values. I'll cover this in a future post.

I'm going to walk thru the process of creating a rule in Autodesk's Revit Model Checker for checking for duplicate elements. The Autodesk Revit Model Checker can be download from the Autodesk App Exchange.
  1. In Revit, from the Add-Ins tab, select the Manage button in the Model Checker pane (Figure 1). This will open the Autodesk Revit Model Review dialog, where you can create and edit check files.
  2. From the Check pulldown menu select Add > Cleanup > Duplicate Elements.
    This is a pre-configured rule, so we do not need to make any additional changes. We could however we could go to the Details tab and make some adjustments to the elements Rotation into account and overlapping phases.
    NewImage
     
  3. Save the check and then run the results.
This is a really simple example, but very powerful tool.


Thursday, March 5, 2015

Autodesk Revit Model Review - Migrating 2014 check files to 2015

If you are a Autodesk Revit Model Review user and you try to migrate a 2014 check file to 2015, you will get the following error:


I have not found any workarounds other than creating the rules again for 2015 from scratch.

Monday, February 16, 2015

Autodesk Revit Model Review - Checking Sheet Names

Autodesk Revit Model Review is a very powerful tool for checking the contents of your model. A friend asked me how he could use Revit Model Review to check the naming of Sheets in project files. This is fairly easy.

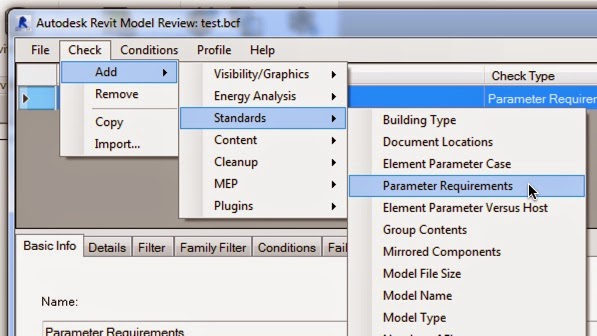
The first step is to define a new check in Model Review. For this particular check, we are going to check the Parameter Requirements which is part of the Standards checks (Figure 1).
Figure 1 - Creating New Check
The next step is to define the "details" of the check. For this rule, we are going to check the Revit parameter sheet name to make sure that the aheet name starts with "ARC-". The easiest method to begin to define the details is to click on the Pick Element And Choose Parameter button. This will allow you to select a model element. For this example, we will select the titleblock.

Figure 2 -
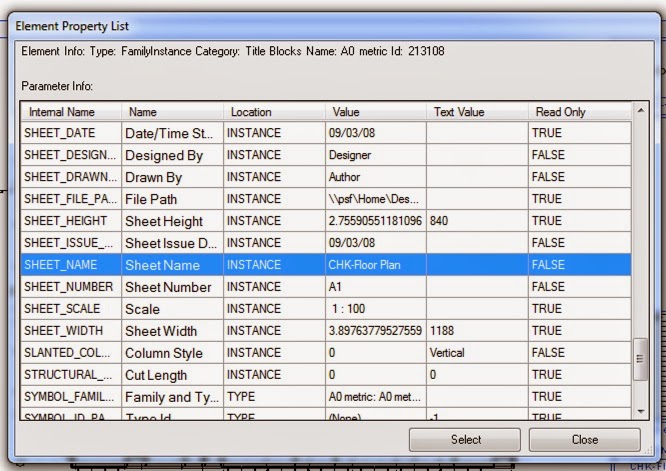
When you select the titleblock, the Element Property List dialog (Figure 3) will open. Scroll thru the list to find the parameter that you want to check. In this example, we are checking the Sheet_Name parameter. Select the parameter and then click the Select button to close the dialog.

Figure 3 - Element Property List Dialog
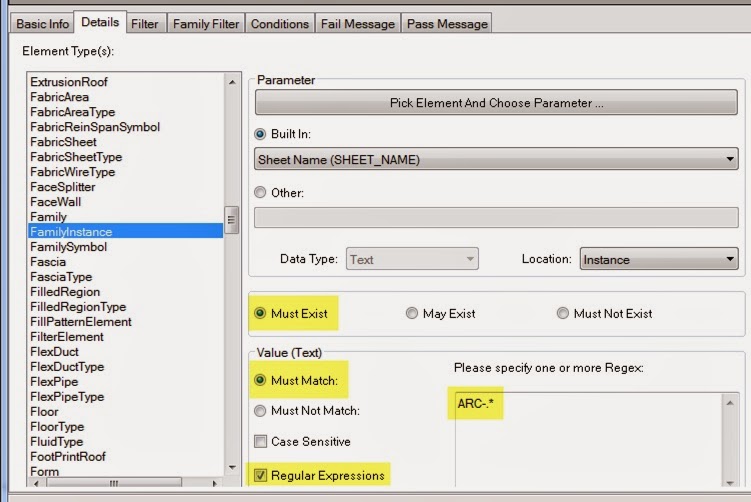
Using the Pick Element allowed automatically selected the specific Element Type(s) and the specific parameter. For this example, we want to check the Sheets in the project to determine if they start with the prefix "ARC-". To do that we need to check the parameter text value. Figure 4 contains the values that must be set:
     Must Exist
     Must Match
     Regular Expression

Under "Please specify one of more Regex:" we need to add the expression ARC-.*. "ARC-" is the text that we want to check. The ".*" is a starts with / ends with expression. This is a common task/check that you will use in Model Review.
Figure 4 - Expression Setup
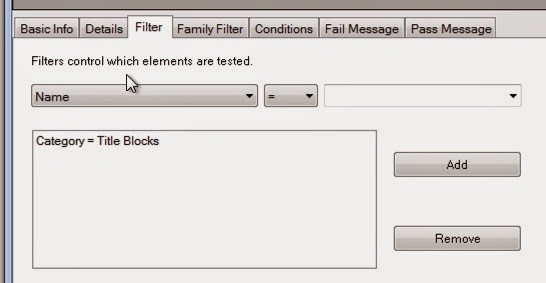
The last item that we need to setup for this task is filtering which model elements Model Review will check. Since we are checking the titleblock sheet name parameter, we should limit the search to just just titleblocks allowing the check to run faster.

Click on the Filter tab. In the dropdown under filter control, select Catergory. In the category selection, click on Title Blocks and then click the Add button to all the filter.

Figure 5 - Filter
The last step is to save the check and run it against the project. Note that one of the the sheets contains the prefix and one does not and the Model Review check is reporting correctly.

Figure 6 -Check Results
Download check file with this link.


Monday, July 7, 2014

Autodesk Revit Model Review

I have been working on a number of different projects with a wide array of client standards. Making sure that models are complaint with those standards can be difficult. Fortunately, Revit has something called Autodesk Revit Model Review. It's a tool that is available as part of your subscription package that, in short allows you to run checks against your model files. Some examples of the checks you can preform are:
  • Model Naming
  • Report Walls are unconnected to a level
  • Number of Filled Regions
  • Text heights that are different from approved heights
Autodesk Revit Model Review has been around for awhile and I believe that it was originally developed by IMAGINiT and I think it is one of the most under utilized tools.

I have been spending a lot of time developing new checks for Model Review, so I thought I would share some of those. The first check I thought I would share is finding the number of In-Place families in a project.

Begin by opening up the Revit Model Review Manage dialog to start developing or editing existing check files. From the Check pull-down menu, click on Add to add a new check. Then click on Standards followed by Number of Elements to create a check that will find elements we are search for.


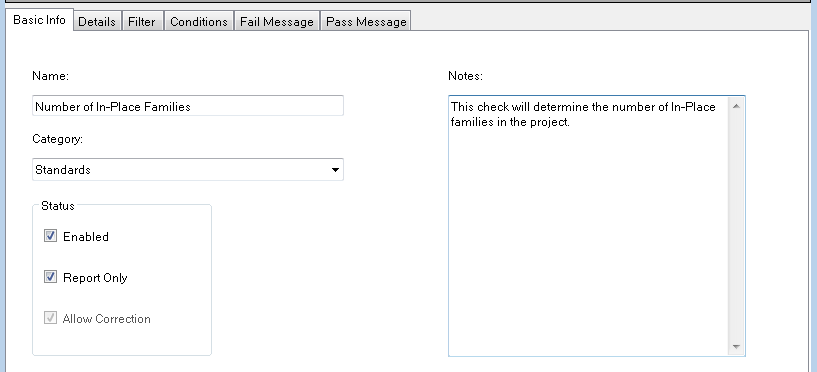
The first thing we need to do is edit the Basic information about the check. In this example, I provided a more descriptive name for the check, provided some general notes about the check and under status I checked the "Report Only" checkbox.


The status section shouldn't be overlooked. There are three options:
  • Enabled: When this option is NOT checked, the rule is disabled, meaning it will not be used.
  • Report Only: The majority of checks have a pass or fail set of conditions. In this particular case, I just want to report the number of in-place families in the project. This example, does not have a set of conditions to either pass or fail.
  • Allow Correction: Some checks provide for an option that attempt to correct the model. When this option is enabled a "wrench" icon in the fix column in the Check Results Browser as shown below. Clicking on the wrench button will attempt to correct the issue. I personally do not use this option, as I am not sure how the tool will correct the issue. If the check you are creating does not allow for auto correction, then the option will be grayed out.
 
 
The next step is to switch to the Filter tab. This is where we will define which families are going to be tested. In the Family Category dropdown, select Is In Place.


When you select Is In Place, TRUE will automatically be selected. You then click on the Add button to create the filter.


The last step is to switch to the Pass Message tab. In this section you can customize the message


The most important step is to save the file and make it available to Check routine. At the top of the dialog, click the Profile button and then Edit. You will then be able to add the check file you just checked to the list of available checks.


When you run the actual check, you will get results similar to below if you have in-place families in your project.
 

Friday, July 4, 2014

Autodesk Revit Model Review - Admin Access Requirement

If you have tried using Autodesk Revit Model Review to either edit and existing checkset or create a new one and you are not a system administrator, you might have run into two known issues. Autodesk Model Review is installed in the \Program Files (x86)\ folder and that requires admin access to edit (thanks for pointing that out Daniel - I should look at the Help file more often). Another issue with the installation is the default output folder (location where checks results will be saved to) is set during installation to the installing user’s documents folder, which as only admins can install, is a folder which the normal users don’t have access rights (thanks Brendon).

If you are not an Admin, you can still create and edit checksets. You just can't save then to the default folder. If you want to run those against models though, we have to alter the ModelReview.config file and that is going to require Admin access.

To change the location of the output file and add a new checkset, open the Model Review config file located:

C:\Program Files (x86)\Autodesk\Autodesk Revit Model Review 2014\ModelReview.config

Edit this file as follows:
  •  Line 9: Copy line 8 to add the information for your new check. I recommend location the check file (.bfc) on a sever or other location that you have read/write access. This will permit you to edit the check file as needed., then copy the physical file to this folder
  • Line 11: Edit the <OutputPath> entry to a location accessible to normal users.


You can then save the ModelReview.config file to a location that you have read/write access. You will then need to find someone in your organization with Admin access that can replace the original Modelreview.config with the file you just created.

Is anyone using Deep Space for analytics? https://www.deepspacesync.com/