| ||||||||||||||||||||||||||||||||||||||||||||||||||||||||||||||
| ||||||||||||||||||||||||||||||||||||||||||||||||||||||||||||||
Showing posts with label Revit. Show all posts
Showing posts with label Revit. Show all posts
Friday, August 12, 2016
RTC Europe 2016 - Why You Should Attend?


Thursday, July 28, 2016
Revit OpEd: Multi-Segment Grid and Crop Boundary Interaction
Revit OpEd: Multi-Segment Grid and Crop Boundary Interaction: When one segment of a multi-segment grid passes entirely beyond a views crop boundary that segment is not displayed. That seems reasonable t...
Wednesday, July 27, 2016
Life in a Virtual Building: Understanding Revit's Design Options
Life in a Virtual Building: Understanding Revit's Design Options: The Design Options feature in Revit allows for the creation of multiple design schemes inside the same project model file. However, if you...
Managing Curtain Walls in Assemble Systems
Curtain Wall families in Revit are indicated by 3 dashed lines at the perimeter of the system. Each Curtain Wall system contains multiple components: Curtain Panels, Curtain Mullions and the boundary condition of the overall Wall System. Upon publishing to Assemble, a Curtain Wall System is represented in Assemble graphically displaying the Curtain Panel and Curtain Mullion components. The boundary condition for the overall Curtain Wall system is not supported, but the summary Quantity is published in the Walls Category. This document outlines how to manage Curtain Walls in Assemble.
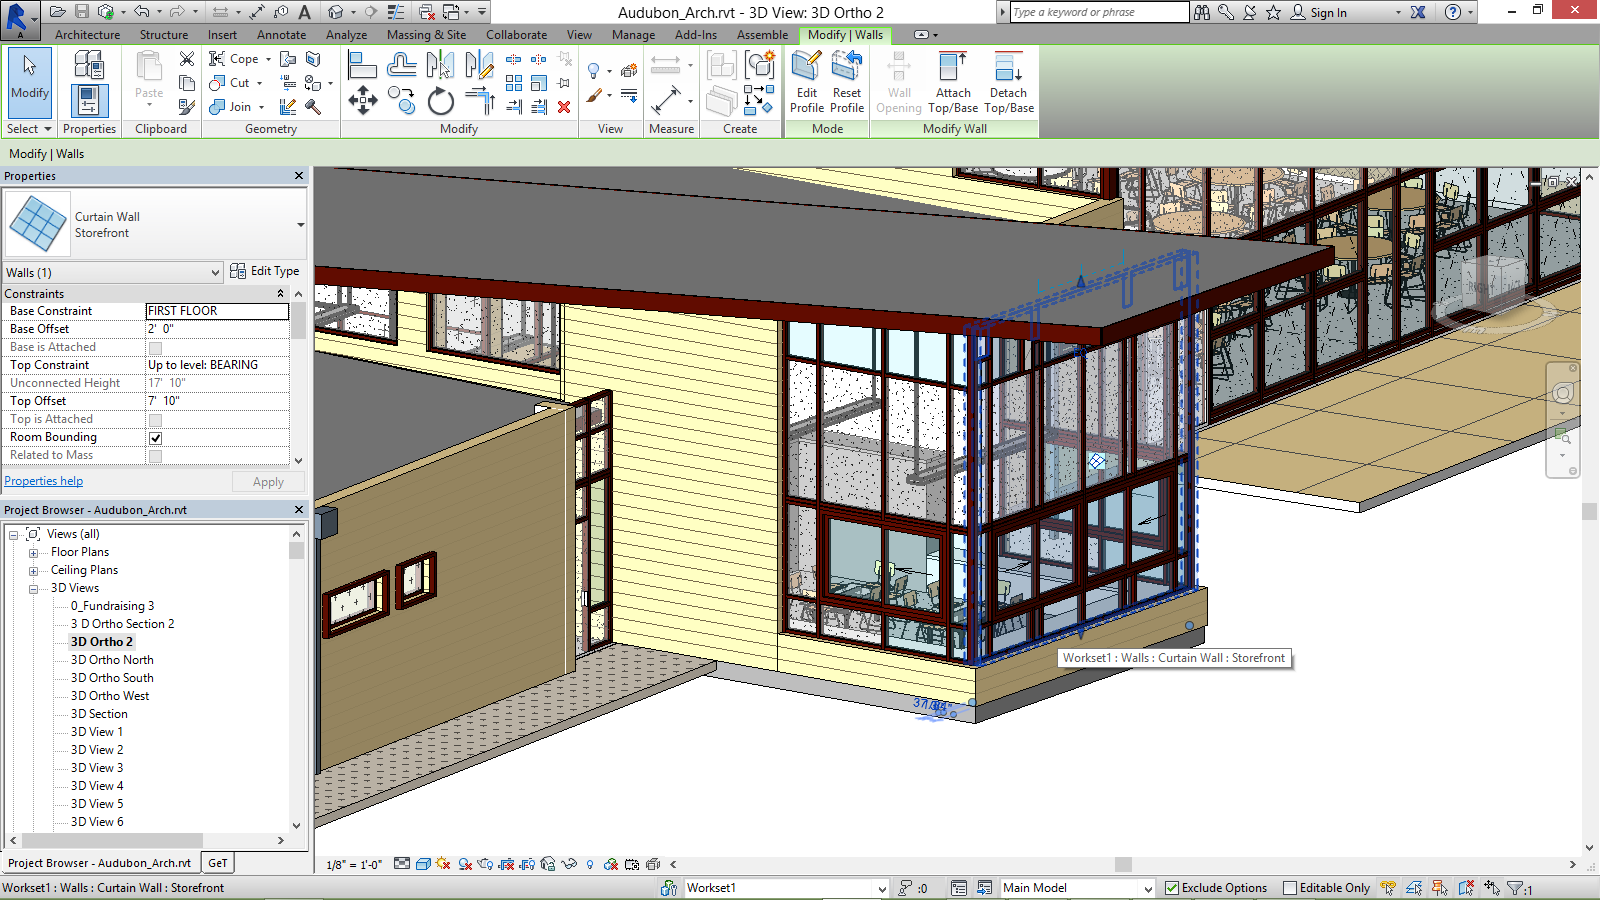
Figure 1: Curtain Wall System highlighted in Revit 2015.
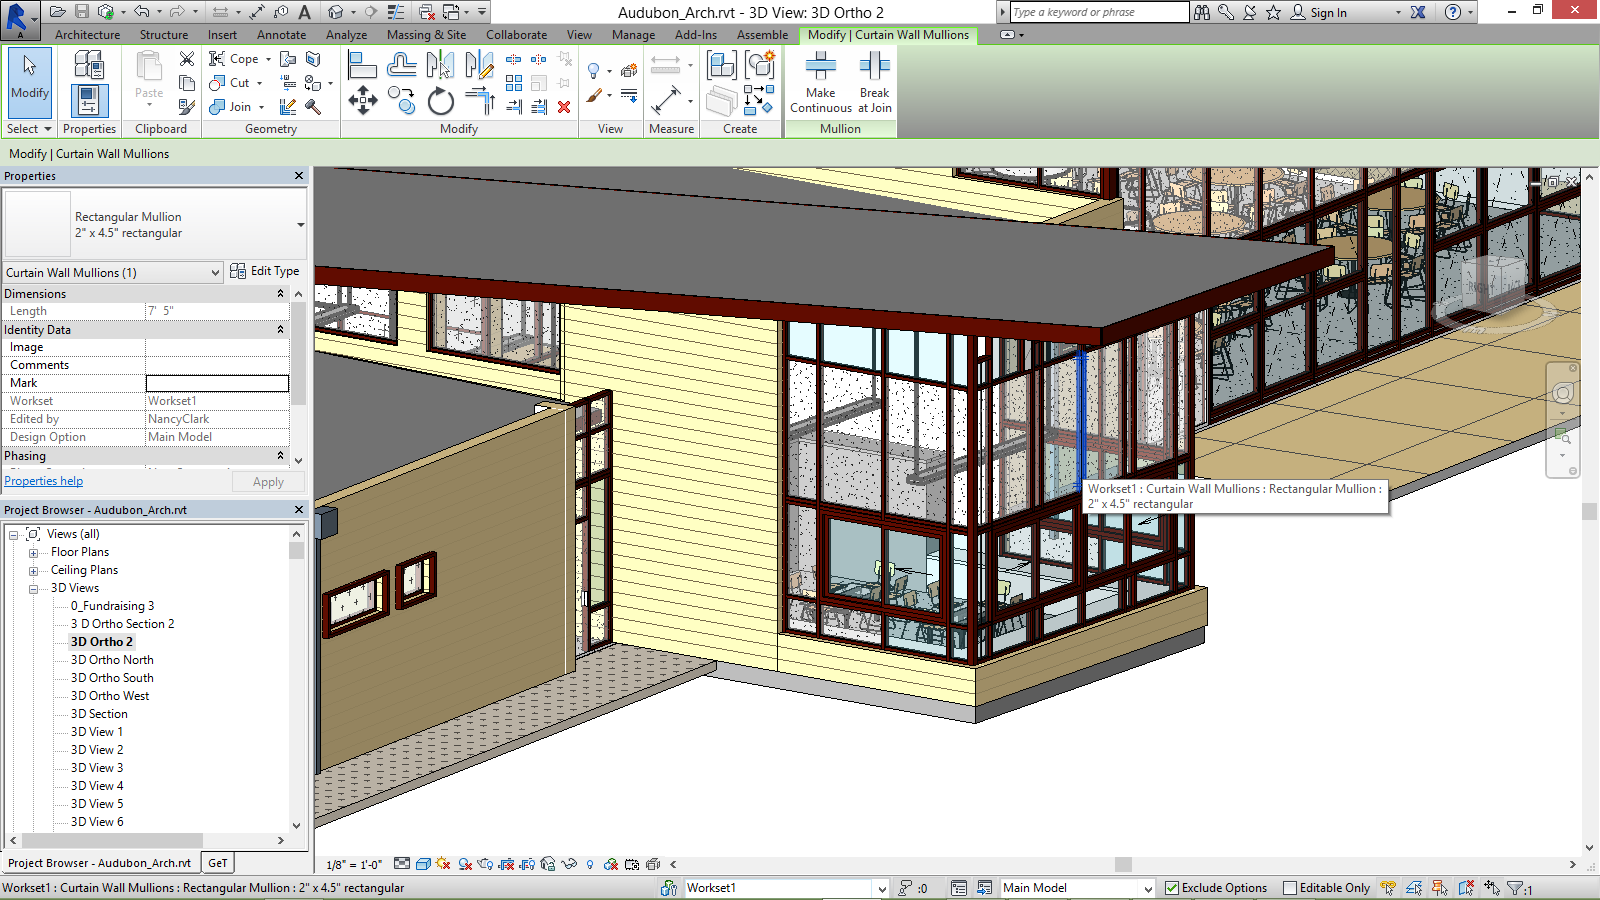
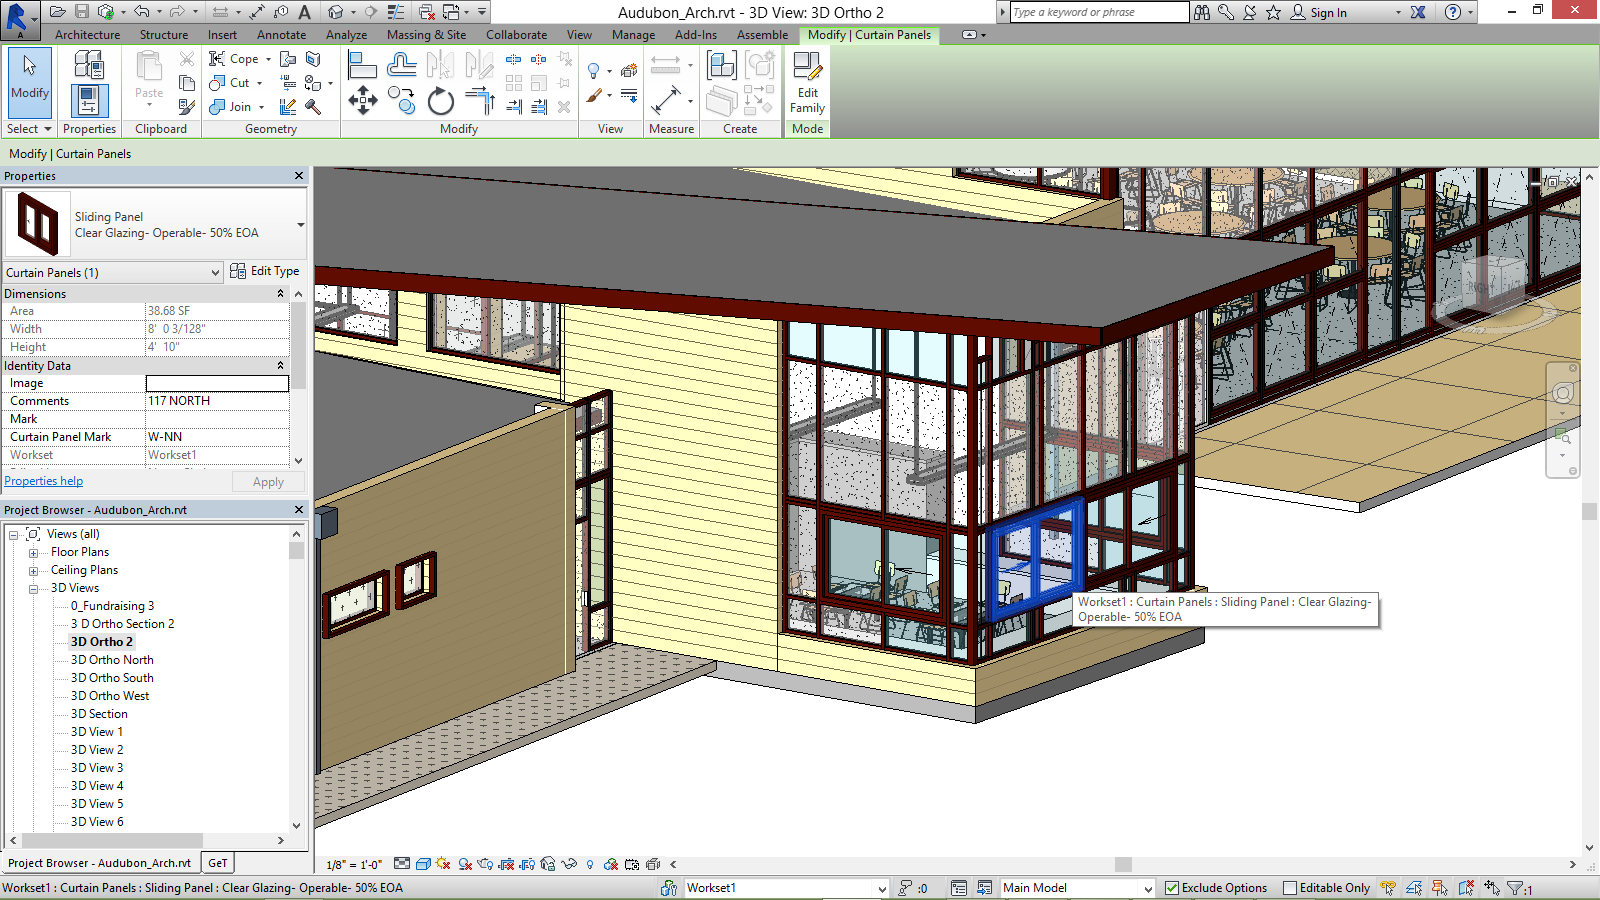
Figure 2: Curtain Panel (a singular component in the Curtain Wall system above) and Curtain Mullion (at right).
The following workflow can help the VDC/BIM Manager, communicate the various curtain wall quantities and their relationship to the estimator.
Step 1: Create a View of the Curtain Panels, Curtain Mullions and Curtain Wall.
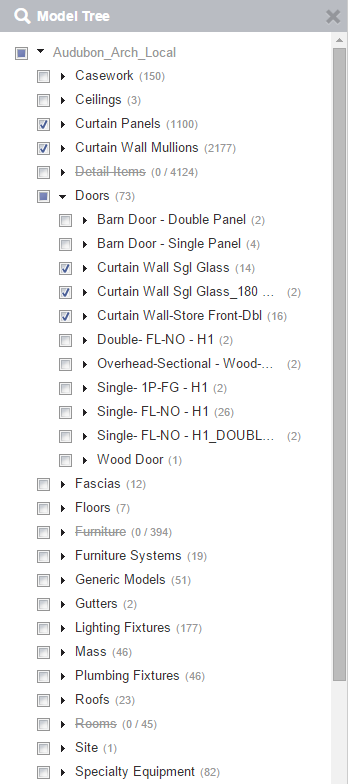
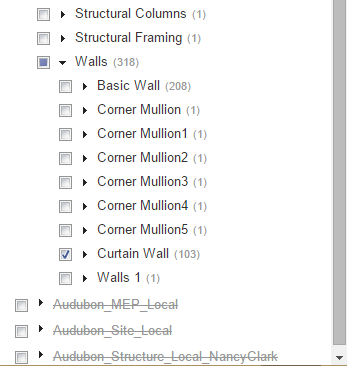
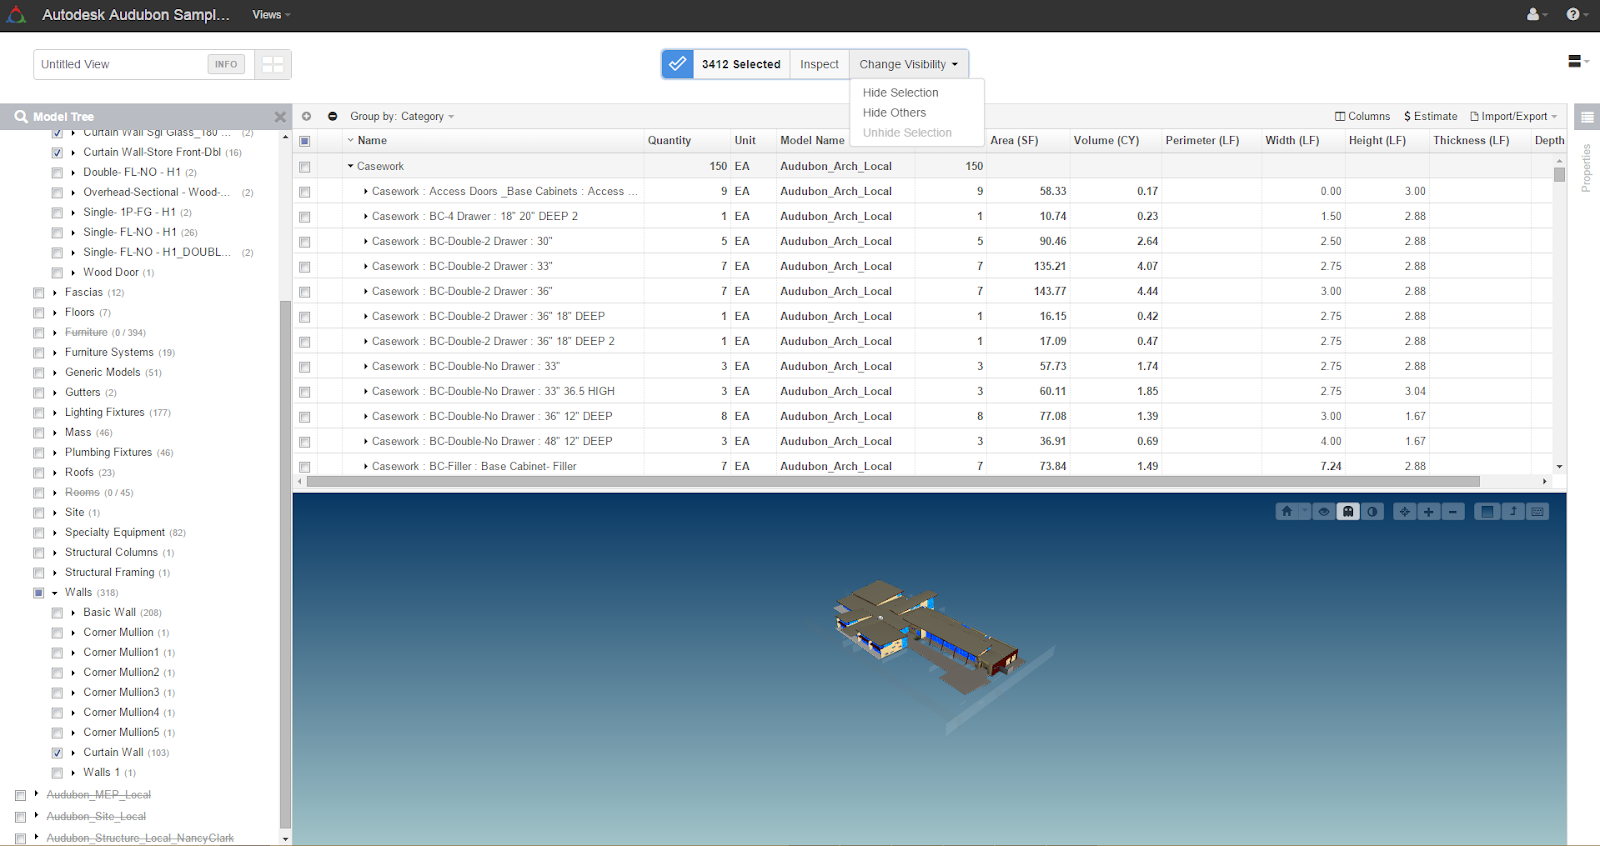
Select all Curtain Panels and Curtain Mullions. Choose the Door families labeled Curtain Panel or Storefront. Finally choose all families in the Walls category labeled Curtain Wall. Then choose Hide Others from the Selection Bar.
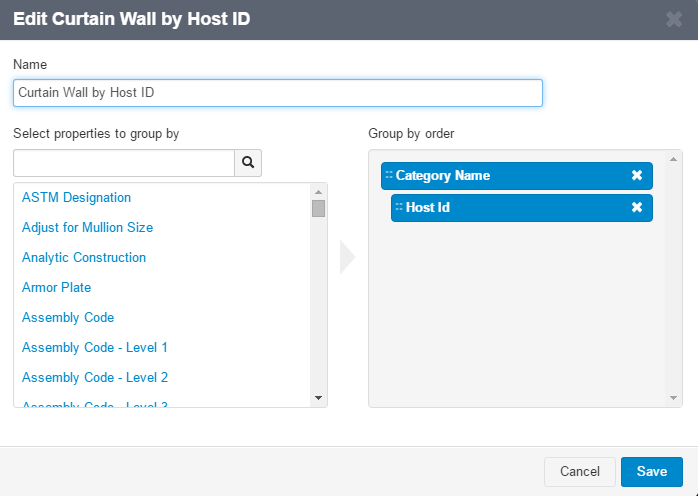
Step 3: Group the View by Host ID
- Click on the Dropdown next to Group by in the Model Inventory header.
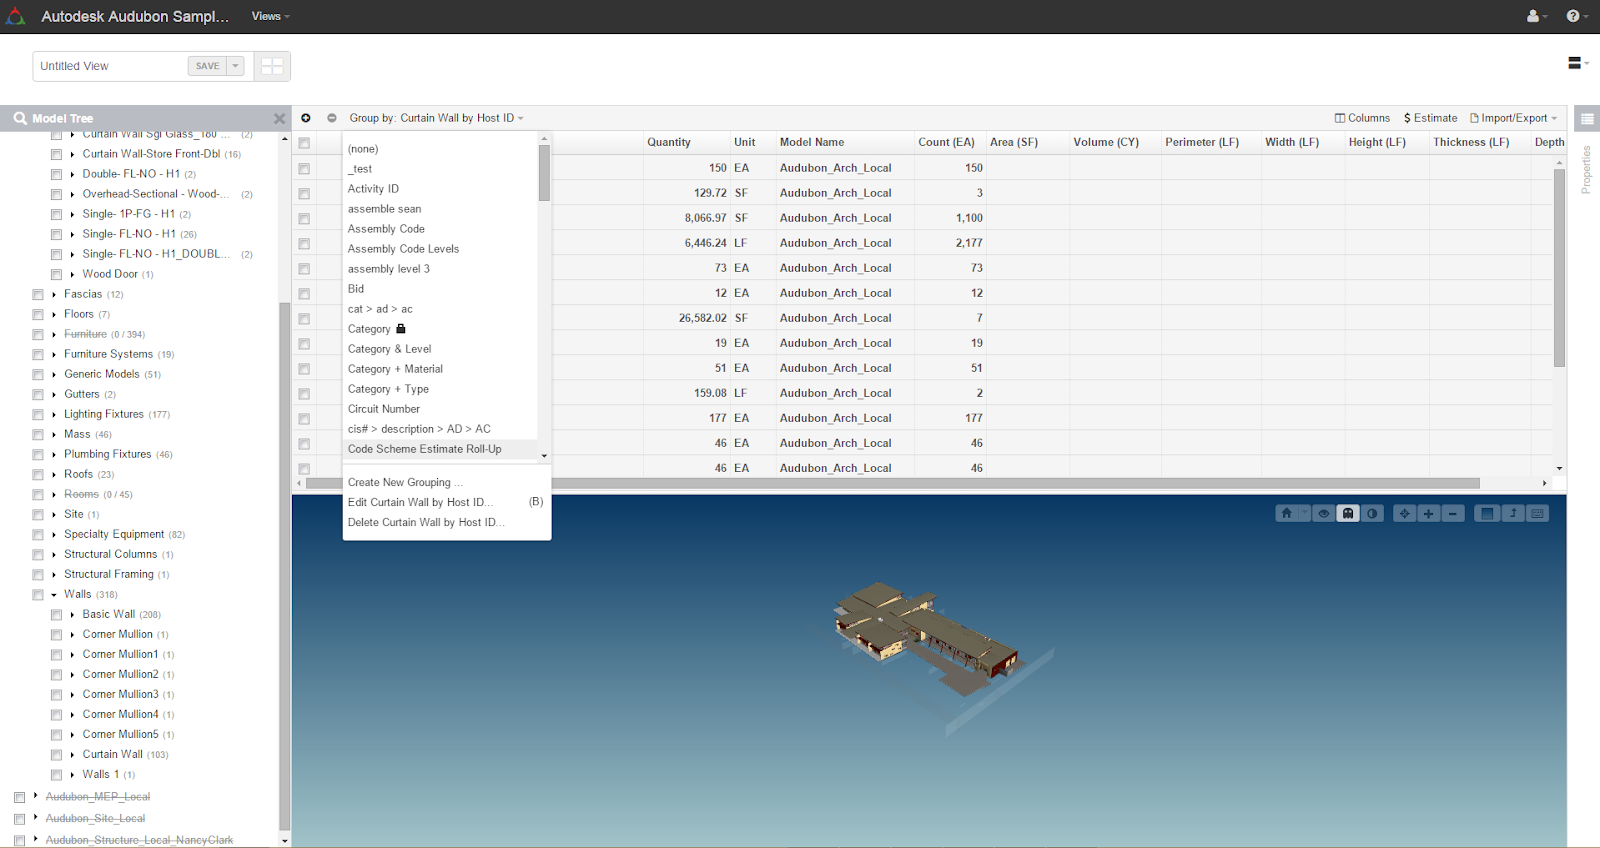
- Click Create New Grouping to make the following Grouping:
Step 4: Save the View
- Click on the Save button to save changes and name your new view.

Step 4: Review the quantities for Curtain Panels and Curtain Walls
- Now in the Curtain Wall View, you can associate the total square feet of Walls: Curtain Wall: Storefront with the Curtain Panels and Doors that have the same Host name of Storefront. In this example the total area of the Curtain Panel labeled Storefront is 7865.69 SF and the total area of Curtain Wall doors is 402.50 SF for a total of 8,268.19 SF (See Figure 4 for details). The corresponding calculations of Walls: Curtain Wall Storefront is 9,321.10 as it represents the total area of the system, including Curtain Panels and Curtain Mullions. Assemble displays both values so that you understand the overall area of a system and the area of just panels or the lineal ft of just mullions.
NOTE: The Walls Category is a redundant quantity and does not display in the VIewer. It represents the total area for a particular system type. Curtain Panel and Curtain Mullions have quantities associated with their geometry individually. Both are displayed at the request of our customers and provide you with two ways to view the same information.
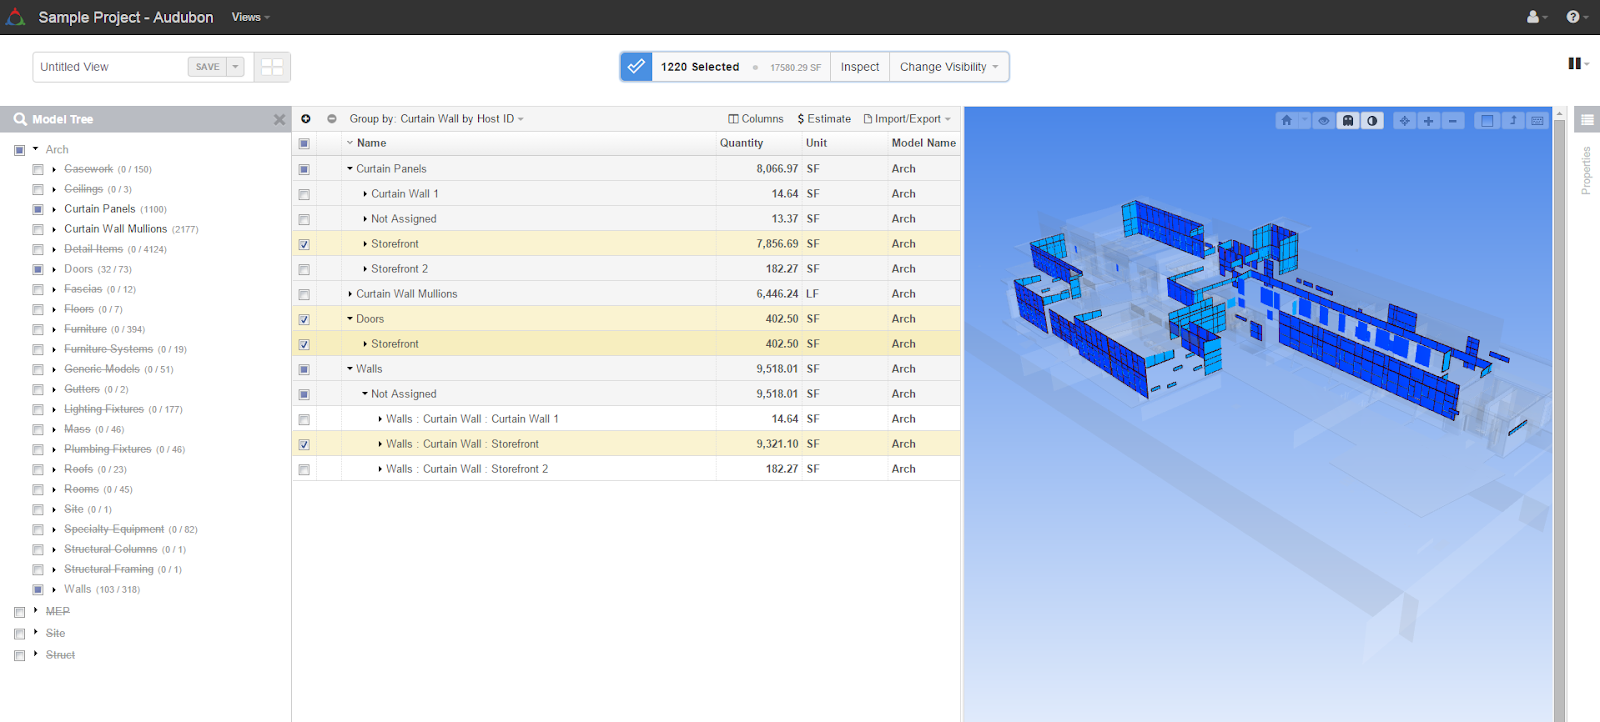
Figure 3 - View of Curtain Walls
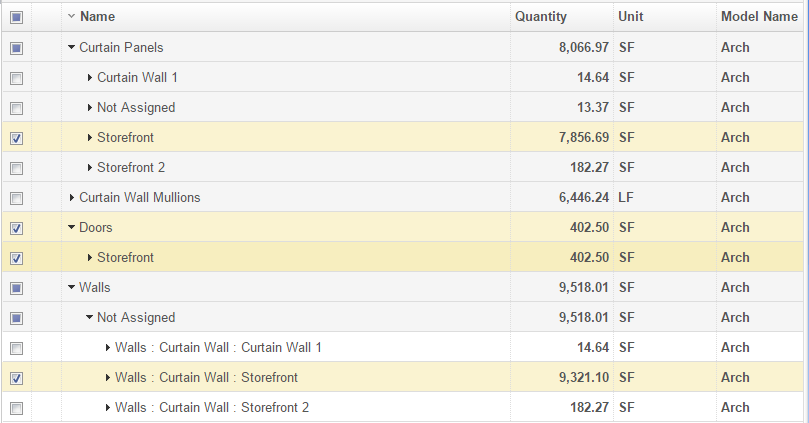
Figure 4- View of Storefront Quantities
Sunday, July 24, 2016
Revit OpEd: Revit 2017 - Associate Family Parameter Tool Tip
Revit OpEd: Revit 2017 - Associate Family Parameter Tool Tip: It's the little stuff... Revit 2017 is missing the tool tip for the Associate Family Parameter button that it took awhile to get. Now ...
Saturday, July 23, 2016
BIM and Beam - Confused about Autodesk's transition to subscription?
BIM and Beam |
|
Posted: 18 Jul 2016 07:11 PM PDT
 By now you’ve heard the news. You’ve thought about what it means for your business. Maybe you’ve talked with your reseller, and maybe you’ve switched your perpetual licenses of Autodesk software to subscription. But maybe not. And that’s ok! Today I’m here to tell you that Autodesk’s transition from perpetual licenses of our software to subscription for new purchases doesn’t have to be scary. AND if you already own perpetual licenses and are on maintenance—that doesn’t have to change either. Here’s what’s really going on. Autodesk’s business model change in a nutshellWe are evolving our business so that our customers can thrive in theirs, providing them the flexibility to subscribe to software solutions tailored to fit their needs as they approach the future of making things. In order to do so, we are gradually ending the sale perpetual licenses of most products, and offering our software solutions as subscriptions.After the transition is complete, new products will need to be purchased via subscription. Why we’re making these changesThe way we design and build is changing rapidly, which also changes the tools we use and the ways companies and individuals buy and access software. By subscribing, you receive a simplified customer experience, lower upfront cost, and the ability to pay for Autodesk products and cloud services for the amount of time that is right for you: monthly, quarterly, annual, and multi-year term lengths (availability may vary depending on region or access type).Your subscription makes it easier to access your software and stay up-to-date. You will be able to subscribe to an individual product or a portfolio of products that can be used by a single-user or shared by multiple users. Providing subscription offerings with flexible packaging and licensing options protects the value of your existing investment in our technologies and delivers a seamless path forward as we discontinue the sales of perpetual licenses. About that perpetual license you already ownYour perpetual license is “evergreen.” Existing or new perpetual licenses sold to you during our transition are still valid. You retain your perpetual software license and can continue to use it in accordance with your perpetual license agreement. If the software product is covered by a maintenance plan, you will also continue to receive maintenance benefits, and you will retain the option to renew your maintenance plans for the affected products and receive corresponding benefits for as long as you want. The end-of-sale of perpetual licenses only impacts the ability to purchase new perpetual licenses.This post by Carl White, Senior Director of Business Models at Autodesk, is a great summary of the facts related to this transition and what it means for your current perpetual licenses. Stay informedCheck out the Autodesk Community forum on Perpetual License Changes, our official list of Frequently Asked Questions, and this Buyer’s Guide that defines our subscription options.In addition, we’re going to continue to post important information on how products important to structural engineering, detailing, and fabrication are impacted here on BIM and Beam. Subscribe to our blog to make sure you’re receiving the most up-to-date information. The post Wait, what? Confused about Autodesk’s transition to subscription? Don’t be. appeared first on BIM and Beam. |
| You are subscribed to email updates from BIM and Beam. To stop receiving these emails, you may unsubscribe now. | Email delivery powered by Google |
| Google Inc., 1600 Amphitheatre Parkway, Mountain View, CA 94043, United States | |
Thursday, July 14, 2016
Wednesday, July 13, 2016
BIM and Beam
BIM and Beam |
|
Posted: 12 Jul 2016 06:40 PM PDT
 Structural engineers, detailers, and fabricators are seeing new opportunities to collaborate and share insight into the steel design. The detailing and fabrication team’s involvement earlier in the project can help bridge knowledge gaps around constructability and factors that impact cost and schedule. Join Steelway Building Systems as they share best practices and processes for working more collaboratively across project teams during the upcoming Connected Insight with Advance Steel webinar. In this webinar, you will learn:
When: July 21, 2016
Time: 11pm PT
Speakers: Mike Vance, PE, Steelway Building Systems; Michael Gustafson, PE, Autodesk
The post Webinar: Connect Insight with Advance Steel appeared first on BIM and Beam. |
| You are subscribed to email updates from BIM and Beam. To stop receiving these emails, you may unsubscribe now. | Email delivery powered by Google |
| Google Inc., 1600 Amphitheatre Parkway, Mountain View, CA 94043, United States | |
Friday, July 8, 2016
practical BIM: COBie is not what you think it is
practical BIM: COBie is not what you think it is: When BIM is talked about mention of COBie is never far away. What I don't understand is why COBie has reached such a privileged position...
practical BIM: COBie is not what you think it is
practical BIM: COBie is not what you think it is: When BIM is talked about mention of COBie is never far away. What I don't understand is why COBie has reached such a privileged position...
Friday, July 1, 2016
Re-post: Syncing Field Equipment Properties with Revit
07/01/2016 from Beyond Design
 Syncing Field Equipment Properties with Revit
BIM 360 Field is offering a great way to track data on the
building suite using your iPad, e.g. the status and install dates of
certain equipment. But what if you want to see this data in Revit?
The answer is pretty simple - the new BIM 360 Plugin for Revit gives you a very easy way to sync the equipment properties in Field with your originally shared Revit model:

After opening the Revit Model, go to Add-Ins > BIM 360 Equipment Properties and chose the model you want to sync with. In this window you will see all your models available in BIM 360 Glue and you will need to select the one corresponding with your currently open Revit Model. You can recognize the Models with shared Equipment Sets on the orange icon:

Once the properties have been synced, you will get the following message:

Now that your Field Properties have been added to your Revit Model, you can see them among the object properties:

Of course, you can use the properties in schedules or in filters - in this case, we used the value for Functioning (Funktionsfähig) to create a view showing all lights colored according to whether they are working correctly (=green) or if they are defective (red).

To learn more about BIM 360 please have a look at the BIM 360 website and visit our online help for BIM 360 Glue and BIM 360 Field.
The answer is pretty simple - the new BIM 360 Plugin for Revit gives you a very easy way to sync the equipment properties in Field with your originally shared Revit model:
After opening the Revit Model, go to Add-Ins > BIM 360 Equipment Properties and chose the model you want to sync with. In this window you will see all your models available in BIM 360 Glue and you will need to select the one corresponding with your currently open Revit Model. You can recognize the Models with shared Equipment Sets on the orange icon:
Once the properties have been synced, you will get the following message:
Now that your Field Properties have been added to your Revit Model, you can see them among the object properties:
Of course, you can use the properties in schedules or in filters - in this case, we used the value for Functioning (Funktionsfähig) to create a view showing all lights colored according to whether they are working correctly (=green) or if they are defective (red).
To learn more about BIM 360 please have a look at the BIM 360 website and visit our online help for BIM 360 Glue and BIM 360 Field.


Subscribe to:
Posts (Atom)
-
 When exporting data from Revit to Navisworks, sometimes parameter data may not appear. For example, Figure 1 shows a pipe create in Revit al...
 -
 In my last Model Checking post, I covered using the CADD Microsystems Revit Model Checker to search for duplicate elements. Autodesk has th...