Tuesday, June 3, 2014

Repost: BIM Troublemaker: Schedule Simulation Using Phases - The Poor Man's 4D Timeliner

I ran across this post from the BIM Troublemaker when I was asked by a staff member if we could do 4D simulation in Revit. I normally do my 4D work in Navisworks, but if you have never worked with Timeliner, then that might not be the best choice. The project itself was also much simpler than the example below, so the suggestion as detailed below turned out to be a viable solution.

Monday, November 19, 2012

Schedule Simulation Using Phases - The Poor Man's 4D Timeliner

I have been doing alot of work lately providing supporting graphics for construction bids.  Sometimes the rain-makers like to show potential clients the sequence of how the building/site will go together.

Rarely do we have the time for a full 4d navis works animation with cranes and all that.  Actually having adequate documentation to support such an effort is even less likely!  I came up with this B.S. modelling approach based upon a presentation by Aaron Maller at AU 2011 about phases, links, groups and design options.

Sooooo...how did i do this in Revit in one day?
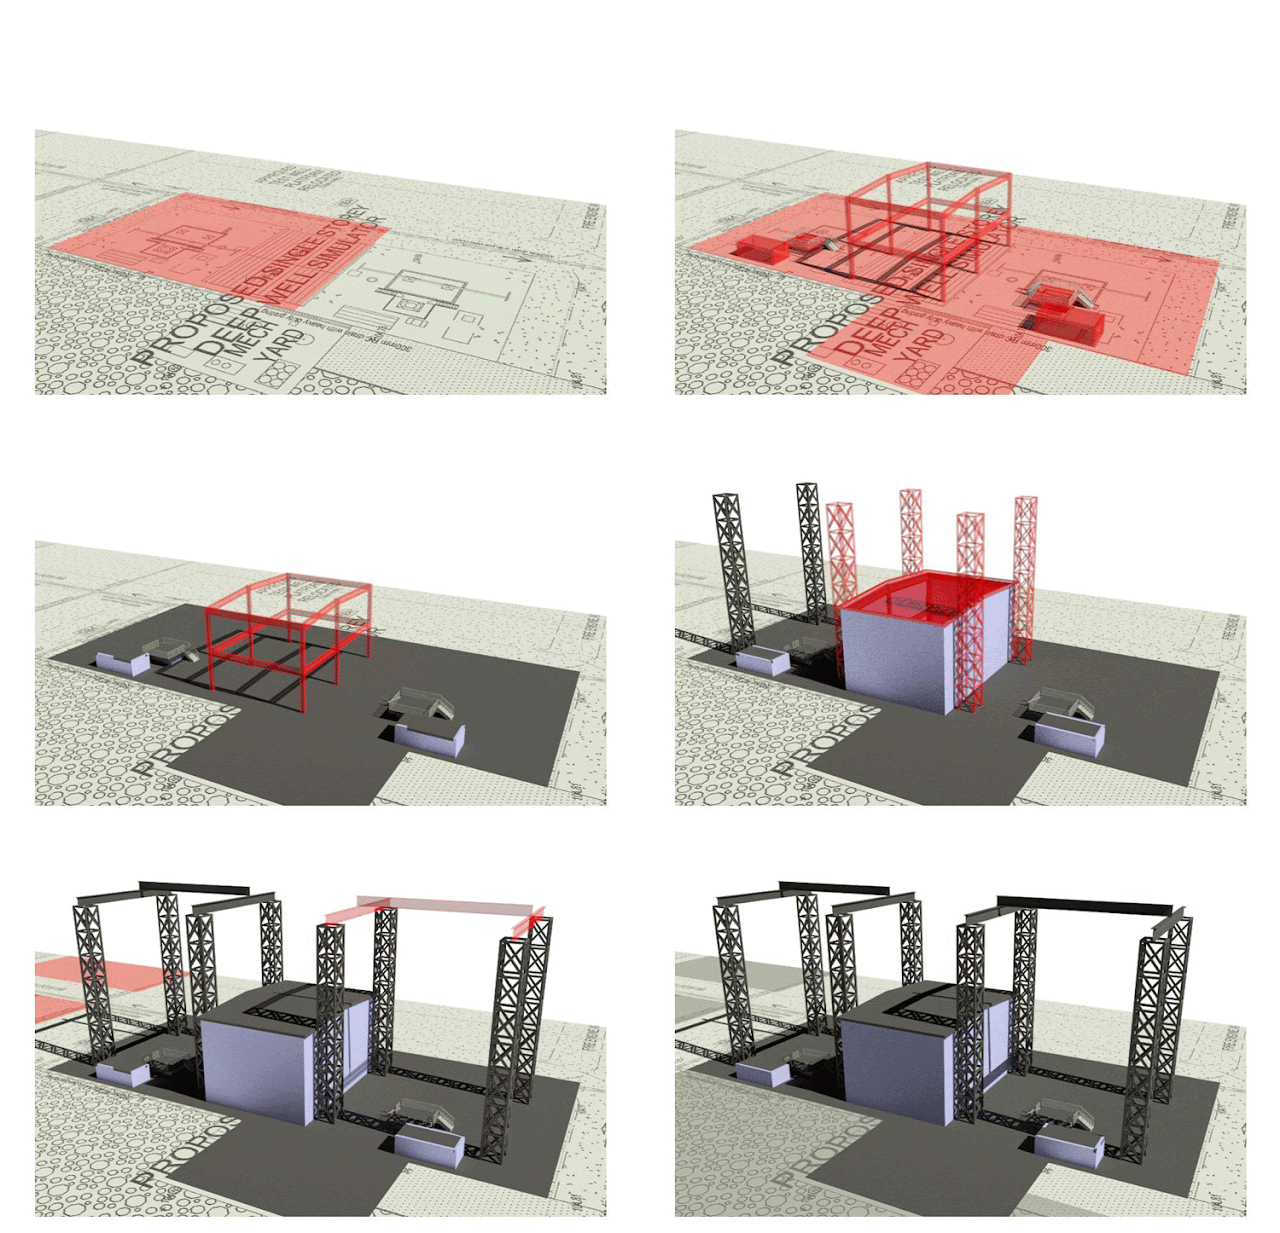


 Pretty simple actually.

First off, I built a simple model and applied the site plan as a decal to a base plane.  This involved saving the pdf as a jpeg, pretty simple in ADOBE.

Then the real work started.  I had to liaise with my scheduler.  I gave him an excel spreadsheet indicating the different parts of the model that could turn on and off.  The scheduler then informed me the timing and durations of the various activities.  I rationalized it all so that I could take snapshots of the construction at 2 week intervals.


Then I went into my Revit model and created phases for each interval in the schedule


This part gets tricky.  i created a phase filter called "Timeline" specifically for the task at hand.  I probably could have used "Show Complete" but I like starting fresh in case i need to tweak things.


After settling on a 3d camera view I liked, I locked the view and set the view template.  Then i copied it a bunch of times, one view/snapshot for each phase.

 
 Now it just gets tedious...follow this step by step:

  1. Work in an default 3d view, not one of your snapshot views.  Make sure phase filter is setup to "Timeline"  Set the default 3d view's phase to the final phase, in this case "Phase 14"
  2. Make sure the model is finished
  3. Assign materials to the "COMPLETE" elements
  4. Change the construction phase setting for all these elements to the final phase, in this case "Phase 14"
  5. Copy all the elements off to the side a memorable distance like 1000m
  6. Create a material to represent a "CONSTRUCTION" phase.  In this exercise, I chose transparent red
  7. Assign the "CONSTRUCTION" material to all the copied elements
  8. Change the phase of all the copied elements to to the initial phase, in this case "Phase 1", they should all dissappear
  9. Change the default 3d view phase to the initial phase, in this case "Phase 1".  The red "CONSTRUCTION" elements should appear, while the "COMPLETE" elements go away.
  10. Move your "CONSTRUCTION" elements back into place.
  11. For all "CONSTRUCTION ELEMENTS", change the "Phase Created" and "Phase Demolished" variables according to the grouping in the schedule spreadsheet.
  12. For all the "COMPLETED ELEMENTS",  change the "Phase Created" variable according to the grouping in the schedule spreadsheet, while setting the "Phase Demolished" variable to none.

Now you can check each of the snapshot views to make sure they look right.


To generate the images, i used the INTERACTIVE RAYTRACE display option.


I let it process for about 1 minute per shot.  then i stopped and saved the image.  Revit will save the picture to the RENDERINGS folder in the project browser.


Export all the images as you would for any jpeg renderings.  Then i compiled all of them into an animated GIF file.  Instructions for this process can be found here:

HOW TO MAKE AN ANIMATED GIF

And thats it....enjoy.  See y'all at AU.

Monday, June 2, 2014

Repost: What Revit Wants: Funny Revit Error Messages

I was researching a new Warning to me and touched base with a friend at the factory and he sent me a link to this great post on Funny Revit Error Messages.

What Revit Wants: Funny Revit Error Messages: Ever felt this way? (via (@apertedesign) Even Revit know that new features will be added in the future: This post used to be ti...

Friday, May 30, 2014

Repost: All Things BIM: Seattle Revit Users Group: Feb 2014 Meeting

All Things BIM: Seattle Revit Users Group: Feb 2014 Meeting: Seattle Revit Users Group: Feb 2014 Meeting

The creative folks in the rainy city have established quite a nice following for their local Revit users group. The February 2014 meeting featured a panel of general contractors sharing their experiences with BIM implementation, including some intriguing ROI numbers.

The have graciously provided a recording of the event:
http://youtu.be/FdFx9iNBKx0

Thursday, May 29, 2014

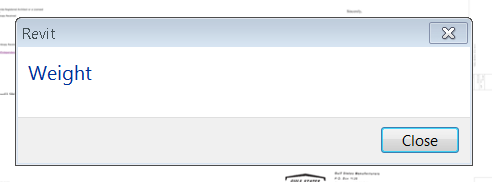
If you are working in Revit and ever run across this "Weight" warning, do not fear, Revit is not making any comments about your actual weight.

It's the first time I have run into this warning myself. After doing some research and reviewing the journal file, the problem appears to be a connectivity issue. The warning seems occurs when you have a file not saved issue. If this is the case, rather than trying to Save to Central, trying saving just to your local first and then Save to Central.


In the case that this actual warning occurred, the user has just loaded in a couple image files and was trying to STC from a remote connection.

Wednesday, May 28, 2014

Repost: All Things BIM: NYC Revit Users Group: Mar 2014 Meeting

All Things BIM: NYC Revit Users Group: Mar 2014 Meeting

Monday, April 07, 2014

NYC Revit Users Group: Mar 2014 Meeting

Continuing the tradition of extremely relevant content, the NYC Revit Users Group invited industry lawyer Rebecca McWilliams, AIA, Esq. (mcwilliams-law.com) to share some insight related to sharing our BIM data with others.

The recording is long, but here are some highlights along the way:

  • 0:42:25 BIM Execution Planning
  • 1:01:30 Risk management and standard of care
  • 1:18:00 LOD
  • 1:35:20 Managing owner expectations and ‘bad’ contract clauses
  • 1:41:00 Litigation case studies

Revit OpEd: 2014 Revit Technology Conference Plug

Revit OpEd: 2014 Revit Technology Conference Plug: If you've been reading this blog for long you've probably heard of the Revit Technology Conference . It's blossomed from an even...

Tuesday, May 27, 2014

Three-Quarters of Contractors Using BIM Globally Report Positive ROI on Their BIM Investments

Three-Quarters of Contractors Using BIM Globally Report Positive ROI on Their BIM Investments

Repost: HOK BIM Solutions: Sync with Central Best Practices

Sync with Central Best Practices

Here’s a list of best practices David Ivey shared for synchronizing with central (SWC) in Revit:

Never leave for extended periods of time (i.e. Lunch, Meeting, Home) after hitting the Sync button.
Revit will often ask for something before the process is complete, and if this happens while you’re out, your team can be stuck with a central file that is ‘in use’, and be kept from saving/working.

Always use the Worksharing Monitor (WSM), and consult it before hitting the Sync button.
This will save you and your team time by not making Revit slowly wade through two or more concurrent SWC attempts. Wait for an opening in the WSM, and then sync. And yes, WSM will work in a Citrix Revit session.


Always use the Sync and Modify Settings command, so that you are presented with the dialogue to release borrowed and owned elements. 

image

Check all available boxes when syncing (with the exception of the Compact box), so that all objects and elements are returned to the central file.


SNAGHTML598843
Add comments in the field provided. These comments are helpful in tracking down problems that may occur from time-to-time in the model. Short, concise descriptions of work are all that is required. This is a problem solving tool, and not a means for assigning blame (as some believe).

Always save locally when prompted.  SWC when prompted when working alone, or after consulting the WSM on small team projects (2-5).  For larger projects, consult with your project’s BIM Coordinator.  On larger projects, there may be a SWC schedule to follow, usually set in 30-120 minute increments depending on project, team, and model size, or during deadlines.

Over-communication with your team is far better than poor communication. Utilize Jabber (or other instant messaging application), email, your phone, or your voice, and make sure you and your team are all on the same page.

Monday, May 26, 2014

Repost: HOK BIM Solutions - Phantom Keynotes

This is a really good post on keynote issues. If you are not already following, I recommend following the HOK BIM Solutions blog. They provide a lot of useful information.

Phantom Keynotes 2.0

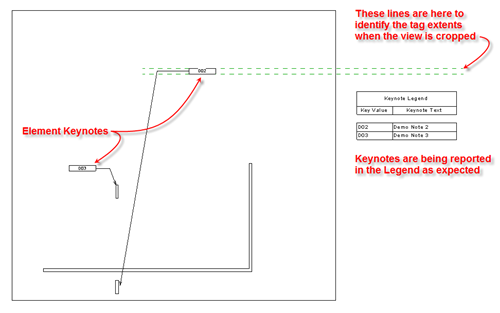
I posted about this topic in the past (see Phantom Keynotes) and it seems that we keep finding issues with Keynote Legends reporting keynotes that don’t seem to exist in the view. I have also written a follow-up post (see More on Keynotes) to discuss other visibility issues and other problems related to this functionality and the current User Interaction shortfalls. Recently some Electrical users pointed me to additional instances of misreporting by Keynote Legends, so this post will summarize those findings. These can be reproduced in Revit 2015.
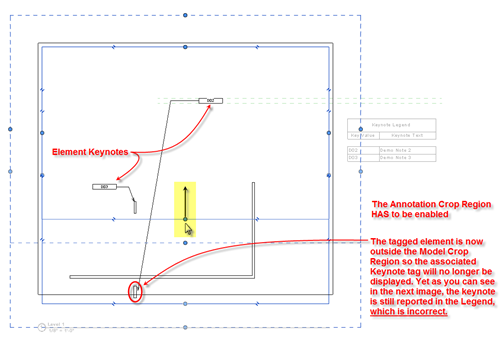
  1. If the Annotation Crop Region is not enabled, keynotes attached to objects that lie outside the model crop region are still reported, which is completely unexpected. The result is the same whether you use Element Keynotes or User Keynotes. The expected behavior should be that if keynoted objects lie outside of the model crop region, those keynotes should not appear in the legend, regardless of whether the annotation crop region is enabled or disabled.
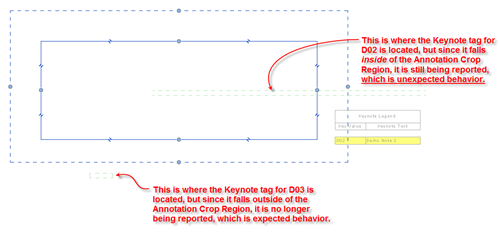
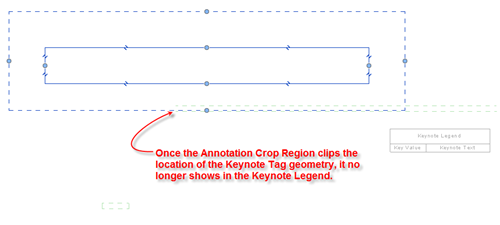
  2. Another instance of Phantom Keynotes occurs with keynoted elements in close proximity to the view’s model crop region. This issue is exacerbated even more when the tags are far from the objects they are attached to. With the Annotation Crop Region enabled, the keynote still appears in the legend unless the boundary of the Annotation Crop region touches the edge of the keynote annotation. This is completely unexpected and the following series of images illustrate the problem:
 image1
If the Model and Annotation Crop Regions are adjusted such that both the model element and the keynote tag lie outside these boundaries, the legend will rightly not report that keynote:
image2
However the Keynote Legend will still incorrectly report the keynote if only the model element is outside of the Model Crop Region, but the Keynote Tag is within the Annotation Crop Region (the legend is actually only concerned about the tag, not the model element):
image3
 image4
Please be very careful when using this functionality and double check your work (don’t assume that the Keynote Legend will hide unrelated keynotes for you!). The only workaround at the moment is to pick the keynote tags that shouldn’t be listed in the legend and manually hide them in the view, which is a very ugly workaround. The following process needs to be followed for each view:
  1. Select all instances of the keynote tag in the project;
  2. Remove all keynote tags visible in the view from the selection;
  3. Right-Click and Hide all instances in the view.
The desired and expected Keynote Legend filtering is as follows:
  • If the keynoted model element is not visible in the view and as a consequence the tag is also not visible, do not report it;
  • If the Keynote Tag is not visible because it is manually hidden in the view or because it touches or is outside the Annotation Crop Region, do not report it

Friday, May 23, 2014

Revit OpEd: No Print Text

Revit OpEd: No Print Text: A fairly common request is a special text that won't print. This would let us add comments to various places in the model for other peop...

Thursday, May 22, 2014

Clarity for Revit Server 2015

We are excited to announce the latest release of the IMAGINiT Clarity product line (Clarity, Clarity Connect & Clarity Connect LT) which launches today. The 2015 version is targeted for firms looking to improve efficiency, provide easier model exchanges with partners, and improved usability with additional fit and finish features based on your input/feedback.

The latest enhancements to the IMAGINiT Clarity product line continue to help solve challenges facing your team. Some notable features in this release include:
Support for Revit and Revit Server 2013/2014 & 2015
Integration with Autodesk BIM 360 Glue
New User Interface With Improved Usability
Added Support for Model Exchange Workflows (Publish and Update Models)
New Tasks and Introducing Task Actions, Provide More Time Savings and Control Options
And 60+ Additional Product Enhancements Makes This Our Biggest and Most Solid Release Yet


IMPORTANT UPGRADE NOTICE:
To upgrade your current installation to the 2015 release, you will need to download and install the new software and enter your new license information. Over the next 24 hours you will receive this information via e-mail. You are welcome to upgrade on your own or we can coordinate time with our professional services team to perform the installation upgrades with your team at no additional cost. Many of the improvements we have to the product are a result of conversations with great customers just like you, which has shaped the 2015 version as another customer workflow focused release.  As always your feedback and input is greatly.


WHAT’S NEXT:
Public webcast on Wednesday, June 04, we will be hosting a free 60 minute webcast to highlight the latest features in the IMAGINiT Clarity products at 10:00 a.m. and 2:00 p.m. Eastern. Attendance is free, but advanced registration is required.

RTC North America Thursday June 19 – Saturday June 21, 2014 come visit us in Chicago to see this first hand and hear how others are using Clarity and Clarity Connect to enhance their workflows.
If you are not able to make the events above and wish for a custom presentation for your firm, please let me know and we are happy to work with you to make that happen.

Work is already beginning on the 2015.1 release and we look forward to your feedback!  Interested in test driving the new release for a few days before you install it? As an existing customer we are happy to provide you access to our cloud hosted server with your data to get familiar with the new release before you roll this out to your users, reply and let me know and we can get this started ASAP for you.   If I missed any detail that you would like to know more about please let me know.
 

Is anyone using Deep Space for analytics? https://www.deepspacesync.com/