Friday, February 20, 2015
Thursday, February 19, 2015
Simply Complex: Want to view your Revit Rooms in 3D? You cant in R...
Simply Complex: Want to view your Revit Rooms in 3D? You cant in R...: Have you ever tried to view your rooms in Revit in a 3D view? You cant do it. Use DynamoBim ! Its free and easy to use. Its ridiculously...
Wednesday, February 18, 2015
Creating Navisworks Template File
If you work with Navisworks, then you probably have noticed that it does not provide a built-in mechanism to create template files like AutoCAD or Revit. What can be done though is creating an empty .NWF file with dummy or empty linked files that can be replaced later.
- Start a new Navisworks file and save the .NWF according to your naming conventions.
- Append dummy or blank files into the project that following your naming conventions. These dummy files should be stored in a folder structure with the .NWF file.
- Create your search sets, clash sets, etc.
- Save the template.
Tuesday, February 17, 2015
Monday, February 16, 2015
Autodesk Revit Model Review - Checking Sheet Names
Autodesk Revit Model Review is a very powerful tool for checking the contents of your model. A friend asked me how he could use Revit Model Review to check the naming of Sheets in project files. This is fairly easy.
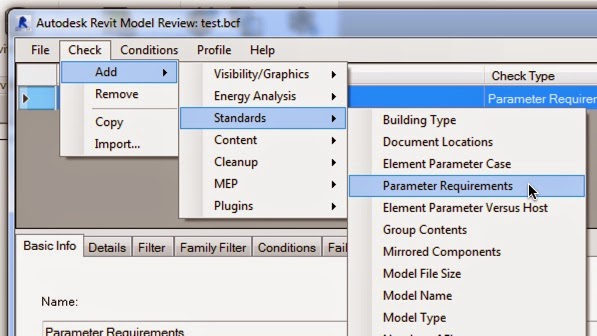
The first step is to define a new check in Model Review. For this particular check, we are going to check the Parameter Requirements which is part of the Standards checks (Figure 1).
The next step is to define the "details" of the check. For this rule, we are going to check the Revit parameter sheet name to make sure that the aheet name starts with "ARC-". The easiest method to begin to define the details is to click on the Pick Element And Choose Parameter button. This will allow you to select a model element. For this example, we will select the titleblock.
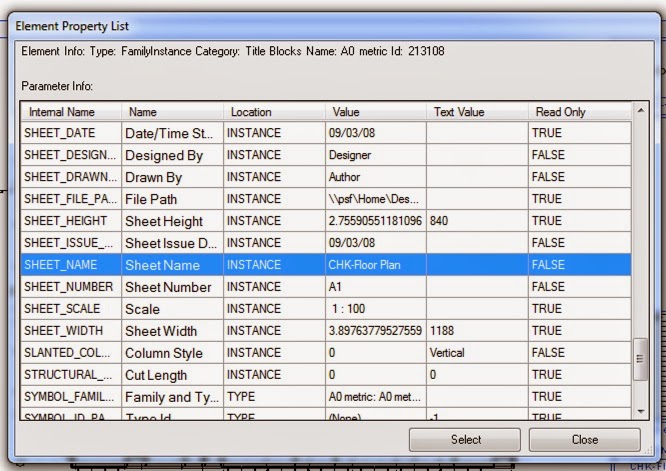
When you select the titleblock, the Element Property List dialog (Figure 3) will open. Scroll thru the list to find the parameter that you want to check. In this example, we are checking the Sheet_Name parameter. Select the parameter and then click the Select button to close the dialog.
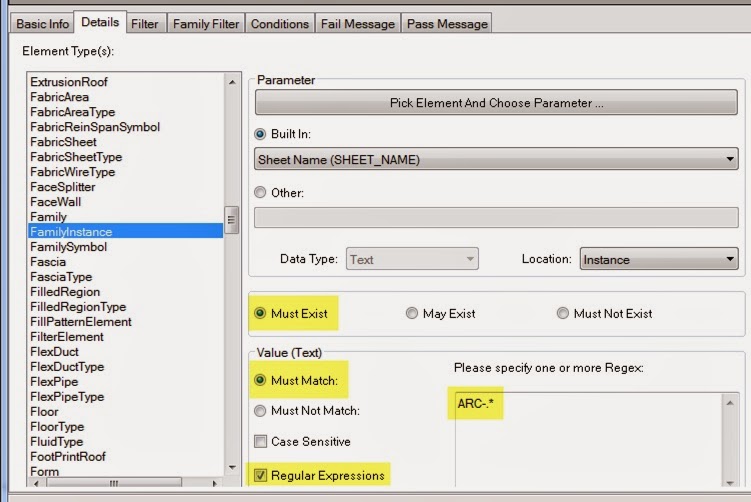
Using the Pick Element allowed automatically selected the specific Element Type(s) and the specific parameter. For this example, we want to check the Sheets in the project to determine if they start with the prefix "ARC-". To do that we need to check the parameter text value. Figure 4 contains the values that must be set:
Must Exist
Must Match
Regular Expression
Under "Please specify one of more Regex:" we need to add the expression ARC-.*. "ARC-" is the text that we want to check. The ".*" is a starts with / ends with expression. This is a common task/check that you will use in Model Review.
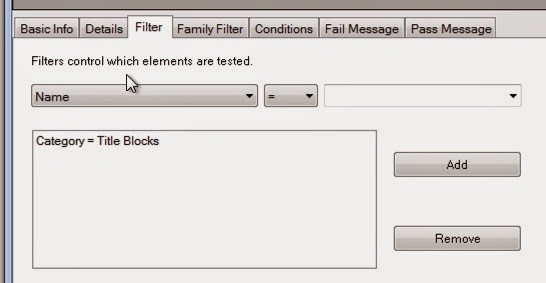
The last item that we need to setup for this task is filtering which model elements Model Review will check. Since we are checking the titleblock sheet name parameter, we should limit the search to just just titleblocks allowing the check to run faster.
Click on the Filter tab. In the dropdown under filter control, select Catergory. In the category selection, click on Title Blocks and then click the Add button to all the filter.
The last step is to save the check and run it against the project. Note that one of the the sheets contains the prefix and one does not and the Model Review check is reporting correctly.
Download check file with this link.
The first step is to define a new check in Model Review. For this particular check, we are going to check the Parameter Requirements which is part of the Standards checks (Figure 1).
 |
| Figure 1 - Creating New Check |
 |
| Figure 2 - |
 |
| Figure 3 - Element Property List Dialog |
Must Exist
Must Match
Regular Expression
Under "Please specify one of more Regex:" we need to add the expression ARC-.*. "ARC-" is the text that we want to check. The ".*" is a starts with / ends with expression. This is a common task/check that you will use in Model Review.
 |
| Figure 4 - Expression Setup |
Click on the Filter tab. In the dropdown under filter control, select Catergory. In the category selection, click on Title Blocks and then click the Add button to all the filter.
 |
| Figure 5 - Filter |
 |
| Figure 6 -Check Results |
Sunday, February 15, 2015
Revit OpEd: Visibility of Floors and their Parts
Revit OpEd: Visibility of Floors and their Parts: Floors are unique in that Revit will show them even if they are below the view range settings of the view (floor plan). They'll be visib...
Friday, February 13, 2015
Revit OpEd: Revising Keynote Data
Revit OpEd: Revising Keynote Data: When you use keynotes and realize you need to revise existing keynote information it easy to change what the keynote text value is. We just ...
Thursday, February 12, 2015
CAD Shack: Browsers on the Right Click
CAD Shack: Browsers on the Right Click: I should be used to little things slipping by unnoticed with Revit by now. Today's discovery, Missing a browser, just right click. There...
Revit Autodesk 360 Glue Export Addin Error: Server did not recognize the value of HTTP Header SOAPAction: http://horizontal-llc.com/LoginForPlugin.
If you are using the Revit addin to export models to 360 Glue and get the following error message:
"Server did not recognize the value of HTTP Header SOAPAction: http://horizontal-llc.com/LoginForPlugin.";
The error message you are receiving is due to the BIM 360 Glue authoring application addins being out of date. To resolve issue please update your authoring application per the instructions below.
1. Close all applications.
2. Click Start and search for Autodesk Application Manager.
3. Open Autodesk Application Manager and click the updates tab at the top.
4. Install all available updates for your Authoring applications.
5. Once all updates are installed please restart your PC.
6. You should now be able launch your 2015 Authoring application and Glue without error.
Thanks to Eric Hansford Autodesk Support Team
Subscribe to:
Comments (Atom)
Is anyone using Deep Space for analytics? https://www.deepspacesync.com/
-
If you are looking for information on how to perform a clean uninstall of Autodesk products, here is a link to a good article on the proces...
-
Systematic Model Review for Effective Coordination Early Registration Deadline: September 6, 201...